Well… it’s me in generated photo upgrading servers nginx and kernel.

NGINX released fixes for the NGINX2Root vulnerabilities on 18 November 2026.
CVE-2026-123007 affects HTTP/2 processing and can lead to memory corruption and remote code execution.
The patched upstream releases are NGINX 1.30.7 on the stable branch and 1.31.9 on mainline. The official NGINX security advisories list the affected branches and fixes.
I have updated several SUSE Leap 16 servers after the disclosure.
The x86_64 machines had a patched package in OBS.
But my ARM64 server needed a different repository because OBS had published the source package without a matching ARM64 binary.
For Debian and Ubuntu use the official NGINX APT repository.
For SUSE Leap 16, I’ve included the OBS procedure and the ARM64 alternative I used. All three procedures use the mainline branch.
Q: What is the NGINX2Root vulnerability?
NGINX2Root covers five NGINX vulnerabilities affecting different configurations:
| CVE | Affected feature | Problem |
|---|---|---|
CVE-2026-123007 |
HTTP/2 | Memory corruption in flow control |
CVE-2026-123633 |
HTTP/2 | Use-after-free |
CVE-2026-121810 |
HTTP/3 | Use-after-free |
CVE-2026-123634 |
DNS resolver | Use-after-free during response processing |
CVE-2026-113425 |
Mail proxy | Use-after-free |
NGINX lists all five in its security advisory index.
CVE-2026-123007 requires HTTP/2 to be enabled. The other bugs depend on the affected feature being in use, with further conditions described in the individual advisories.
For CVE-2026-123007 SUSE’s advisory describes a heap buffer overflow that can crash workers. Code execution is possible when ASLR is disabled or an attacker can bypass it.
In the researchers’ demonstration, the NGINX exploit runs code with the worker’s privileges. They then used a separate Linux kernel SCTP vulnerability to reach host root.
Updating NGINX fixes the NGINX part of that chain; the kernel needs its own assessment.
A distribution may also backport the fixes while keeping an older NGINX version number. Check its security advisory and the full package release before deciding that nginx -v proves a server is vulnerable.
Before changing repositories
Start with a configuration test and a backup. Run these commands on the server you are updating:
sudo nginx -t

backup_dir="/root/nginx-backup"
sudo install -d -m 0700 "$backup_dir"
sudo cp -a /etc/nginx "$backup_dir/"
sudo nginx -T 2>&1 | sudo tee "$backup_dir/effective-config.txt" >/dev/null
sudo systemctl cat nginx | sudo tee "$backup_dir/nginx-service.txt" >/dev/null
If certificates or private keys live outside /etc/nginx, make sure they are backed-up too.
Save the current package versions and keep rollback packages available.
1. Upgrade NGINX on Debian with the official APT repository
These steps follow the official NGINX instructions for Debian. Use a Debian release and architecture listed on that page.
Verify the NGINX signing key
Install the prerequisites and download the key into a temporary directory:
sudo apt-get update
sudo apt-get install curl gnupg ca-certificates lsb-release debian-archive-keyring

nginx_key_dir="$(mktemp -d)"

curl -fsSL https://nginx.org/keys/nginx_signing.key \
  -o "$nginx_key_dir/nginx_signing.key"

gpg --show-keys --with-fingerprint "$nginx_key_dir/nginx_signing.key"
Check that the output includes the fingerprint published in the NGINX package documentation:
573B FD6B 3D8F BC64 1079 A6AB ABF5 BD82 7BD9 BF62
The file can contain additional signing keys. After verifying it, create the APT keyring:
gpg --batch --yes --dearmor \
  --output "$nginx_key_dir/nginx-archive-keyring.gpg" \
  "$nginx_key_dir/nginx_signing.key"

sudo install -m 0644 "$nginx_key_dir/nginx-archive-keyring.gpg" \
  /usr/share/keyrings/nginx-archive-keyring.gpg
Add the Debian repository and upgrade
Use the codename of the installed Debian release:
printf 'deb [arch=%s signed-by=/usr/share/keyrings/nginx-archive-keyring.gpg] https://nginx.org/packages/mainline/debian %s nginx\n' \
  "$(dpkg --print-architecture)" "$(lsb_release -cs)" |
  sudo tee /etc/apt/sources.list.d/nginx.list >/dev/null

sudo tee /etc/apt/preferences.d/99nginx >/dev/null <<'EOF'
Package: nginx nginx-*
Pin: origin nginx.org
Pin-Priority: 900
EOF

sudo apt-get update
apt-cache policy nginx
sudo apt-get --simulate install nginx
The candidate should come from nginx.org and be 1.31.9 or a newer mainline release.
Review any proposed package removals, especially modules you load. If an existing nginx.org entry uses the stable branch, update that entry instead of keeping duplicate stable and mainline entries.
Install the update once the simulation is acceptable:
sudo apt-get install nginx
dpkg-query -W nginx
Continue with the restart and verification steps below.
2. Upgrade NGINX on Ubuntu with the official APT repository
The process is the same, with Ubuntu’s archive keyring and repository path. The official Ubuntu package instructions list the supported releases.
Install the Ubuntu prerequisites:
sudo apt-get update
sudo apt-get install curl gnupg ca-certificates lsb-release ubuntu-keyring
REPEAT key download from the Debian section explained above, fingerprint check and keyring installation, starting with the temporary key directory after the prerequisite commands. Ubuntu uses the same NGINX key and the same /usr/share/keyrings/nginx-archive-keyring.gpg file.
Then configure the Ubuntu repository:
printf 'deb [arch=%s signed-by=/usr/share/keyrings/nginx-archive-keyring.gpg] https://nginx.org/packages/mainline/ubuntu %s nginx\n' \
  "$(dpkg --print-architecture)" "$(lsb_release -cs)" |
  sudo tee /etc/apt/sources.list.d/nginx.list >/dev/null

sudo tee /etc/apt/preferences.d/99nginx >/dev/null <<'EOF'
Package: nginx nginx-*
Pin: origin nginx.org
Pin-Priority: 900
EOF

sudo apt-get update
apt-cache policy nginx
sudo apt-get --simulate install nginx
Check the candidate version and proposed changes, then upgrade:
sudo apt-get install nginx
dpkg-query -W nginx
Use the Ubuntu codename reported by the machine.
Pointing APT at another release’s repository can introduce incompatible dependencies.
3. Upgrade NGINX on openSUSE Leap 16 using OBS
For my x86_64 Leap 16.0 servers, I used the OBS server:http repository for Leap 16.0. On 19 November 2026, it provided nginx-1.31.9-lp160.346.1.x86_64.
This is an additional OBS development repository with its own package vendor. Adding it changes where NGINX updates come from. SUSE’s CVE tracker is the place to check the standard distribution’s fix status.
Add and verify the OBS repository
Confirm the operating system and architecture:
cat /etc/os-release
uname -m
rpm -q nginx
For Leap 16.0, add the matching repository at a lower priority than the standard repositories:
sudo zypper install curl gpg2 ca-certificates

sudo zypper addrepo --refresh --gpgcheck --priority 110 \
  https://download.opensuse.org/repositories/server:/http/16.0/ \
  nginx-server-http

obs_key_dir="$(mktemp -d)"

curl -fsSL \
  https://download.opensuse.org/repositories/server:/http/16.0/repodata/repomd.xml.key \
  -o "$obs_key_dir/server-http.key"

gpg --show-keys --with-fingerprint "$obs_key_dir/server-http.key"
The server:http signing key I verified for these updates had this fingerprint:
F9F2 2DA4 3BD1 5B00 05E5 5C53 B268 0E8E 08D1 D8B3
If the fingerprint differs, verify the current key with the repository maintainer before importing it. After verification:
sudo rpmkeys --import "$obs_key_dir/server-http.key"
sudo zypper refresh nginx-server-http

zypper search --details --match-exact \
  --repo nginx-server-http nginx
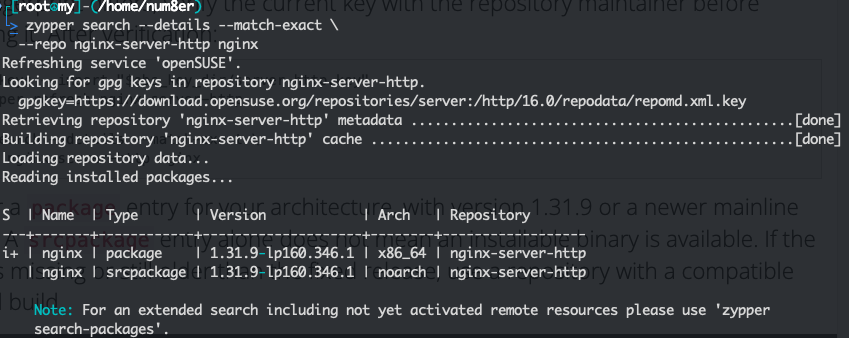
Look for a package entry for your architecture, with version 1.31.9 or a newer mainline release.
A srcpackage entry alone does not mean an installable binary is available. If the binary is missing or still older than the fixed release, use a repository with a compatible patched build.
Check modules, then switch the NGINX package
Preview the update:
sudo zypper --no-refresh install --dry-run --no-recommends \
  --allow-vendor-change --from nginx-server-http nginx
In my case lua and echo module packages were installed on my servers, but neither module was loaded.
Their dependencies required the old NGINX version and blocked the upgrade.
Check your own installed packages and module directives before removing anything:
rpm -qa | grep '^nginx'

sudo nginx -T 2>/dev/null |
  grep -E '^[[:space:]]*load_module[[:space:]]' || true
If those two packages are present and you have confirmed that you do not use them, review their removal first:
sudo zypper remove --dry-run nginx-module-lua nginx-module-echo
Only in that case, remove them and repeat the upgrade simulation (dry-run):
sudo zypper remove nginx-module-lua nginx-module-echo

sudo zypper --no-refresh install --dry-run --no-recommends \
  --allow-vendor-change --from nginx-server-http nginx
For modules your configuration uses, find a compatible build before upgrading.
Avoid forcing an installation with broken dependencies.
When the simulation is acceptable, install the latest compatible package from OBS:
sudo zypper --no-refresh install --no-recommends \
  --allow-vendor-change --from nginx-server-http nginx

rpm -q nginx
ARM64: check binary availability before using OBS
My ARM64 Leap 16 server had no matching binary in that OBS repository during this update.
I used NGINX’s official mainline repository for SLES 16 instead.
NGINX lists SLES 16 ARM64 support in its package documentation
I tested the package against the existing Leap configuration before installing it.
If OBS has no patched aarch64 package, use this alternative with the prerequisites listed above.
Configure it in place of the OBS repository.
Let’s download and inspect the official NGINX signing key:
nginx_key_dir="$(mktemp -d)"
curl -fsSL https://nginx.org/keys/nginx_signing.key \
  -o "$nginx_key_dir/nginx_signing.key"

gpg --show-keys --with-fingerprint "$nginx_key_dir/nginx_signing.key"
Verify the NGINX fingerprint shown in the Debian section, then add the key and repository:
sudo rpmkeys --import "$nginx_key_dir/nginx_signing.key"

sudo zypper addrepo --refresh --gpgcheck --priority 110 \
  https://nginx.org/packages/mainline/sles/16 \
  nginx-upstream-mainline

sudo zypper refresh nginx-upstream-mainline

zypper search --details --match-exact \
  --repo nginx-upstream-mainline nginx

sudo zypper --no-refresh install --dry-run --no-recommends \
  --allow-vendor-change --from nginx-upstream-mainline nginx
Resolve module dependencies as described above. Check the simulation for a patched ARM64 candidate, then install it:
sudo zypper --no-refresh install --no-recommends \
  --allow-vendor-change --from nginx-upstream-mainline nginx

rpm -q nginx
The package I installed was 1.31.9-1.sles16.ngx.aarch64. The upstream package supplies its own service unit and can add /etc/nginx/conf.d/default.conf.
Review that default site and any .rpmnew files before restarting so they do not replace or conflict with your existing virtual hosts.
Keep only the repository path you intend to use for future NGINX updates.
Restart NGINX and verify the update
A configuration reload does not replace the running executable. After reviewing the configuration, test it and restart the service. Allow for a brief interruption to existing connections.
sudo nginx -t &&
  sudo systemctl daemon-reload &&
  sudo systemctl restart nginx

sudo systemctl is-active nginx
sudo nginx -v
sudo journalctl -u nginx --since "5 minutes ago" --no-pager
Request a page that reaches your application:
curl -I https://example.com/
Replace example.com with your hostname. If a CDN sits in front of NGINX, check the origin separately as well. A cached page can return 200 while the origin is failing.
You can also check which executable the running master process uses:
nginx_pid="$(systemctl show nginx -p MainPID --value)"
sudo readlink "/proc/$nginx_pid/exe"
The result should point to the installed binary without a (deleted) suffix.
For these mainline repository instructions, confirm that the installed version is 1.31.9 or newer.
If you use the stable branch instead, the fixes start at 1.30.7.
Temporary mitigation if you cannot update immediately
Disabling HTTP/2 blocks the paths for CVE-2026-123007 and CVE-2026-123633 once existing HTTP/2 connections have ended.
It leaves the other three NGINX vulnerabilities to assess. The researchers’ mitigation guidance covers those configuration-specific cases.
For NGINX 1.25.1 and newer, remove the legacy http2 parameter from affected listen directives and set:
listen 443 ssl;
http2 off;
Check every server sharing the affected listening address and port. On older releases, remove http2 from the listen directives; they do not support the standalone http2 directive.
Test the configuration, then restart NGINX to close connections that could still use the old configuration:
sudo nginx -t && sudo systemctl restart nginx
Services that require HTTP/2, including native gRPC, will be affected. Apply the package update when a compatible build is available.
References
- NGINX official security advisories and fixed versions
- NGINX official Linux package installation instructions
- OBS server:http repository for openSUSE Leap 16.0
- SUSE tracker for CVE-2026-123007
- NGINX2Root technical research and mitigations
P.S. This is my real desk. Decided to put at bottom of post to hide real “creativity” on my table as bonus (: